Unless you work in a commercial printing company or
service bureau, you probably print images to a desktop printer, such as an
inkjet, dye sublimation, or laser printer, not to an imagesetter. Photoshop
lets you control how your image is printed.
Monitors display images using light, whereas desktop
printers reproduce images using inks, dyes, or pigments. For this reason, a
desktop printer can’t reproduce all the colors displayed on a monitor.
However, by incorporating certain procedures (such as a color management
system) into your workflow, you can achieve predictable results when printing
your images to a desktop printer. Keep these considerations in mind when
working with an image you intend to print:
- If your image is in RGB mode, do not convert
the document to CMYK mode when printing to a desktop printer. Work entirely
in RGB mode. As a rule, desktop printers are configured to accept RGB data
and use internal software to convert to CMYK. If you send CMYK data, most
desktop printers apply a conversion anyway, with unpredictable results.
- If you want to preview an image as printed to
any device for which you have a profile, use the Proof Colors command.
- To reproduce screen colors accurately on the
printed page, you must incorporate color management into your workflow. Work
with a monitor that is calibrated and characterized. Ideally, you should
also create a custom profile specifically for your printer and the paper you
print on, though the profile supplied with your printer can produce
acceptable results.
If you have a custom color profile for a specific
printer, ink, and paper combination, letting Photoshop manage colors may
produce better results than letting the printer manage colors.
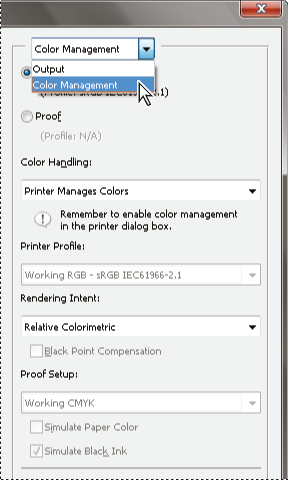
- Choose File > Print.
- Choose Color Management
from the pop-up menu.
- For Color Handling, choose
Photoshop Manages Colors.
- For Printer Profile, select
the profile that best matches your output device and paper type. If there
are any profiles associated with the current printer, they are placed at the
top of the menu, with the default profile selected.
The more accurately the profile describes the
behavior of the output device and printing conditions (such as paper type),
the more accurately the color management system can translate the numeric
values of the actual colors in a document.
- (Optional) Set any of the
following options.
- Rendering Intent
-
Specifies how Photoshop converts colors to the
destination color space.
- Black Point Compensation
-
Preserves the shadow detail in the image by
simulating the full dynamic range of the output device.
- Match Print Colors
-
Enabled when you let Photoshop manage color.
Select to view image colors in the preview area as they will actually
print.
- Gamut Warning
-
Enabled when Match Print Colors is selected.
Select to highlight out-of-gamut colors in the image, as determined by the
selected printer profile. A gamut is the range of colors that a color
system can display or print. A color that can be displayed in RGB may be
out of gamut for your current printer profile.
- Show Paper White
-
Sets the color white in the preview to the color
of the paper in the selected printer profile. This produces a more
accurate print preview if you're printing on off-white paper such as
newsprint or art papers that are more beige than white. Since absolute
white and black create contrast, less white in the paper will lower the
overall contrast of your image. Off-white paper can also change the
overall color cast of the image, so yellows printed on beige paper may
appear more brown.
- Access the color management
options for the printer driver from the Print Settings dialog box, which
automatically appears after you click Print. In Windows, click the
Preferences button to access the printer driver options. In Mac OS, use the
pop-up menu from the Print Settings dialog box to access the printer driver
options.
- Turn off color management
for the printer, so the printer profile settings won’t override your profile
settings.
Every printer driver has different color
management options. If it’s not clear how to turn off color management,
consult your printer documentation.
- Click Print.
Note: If you get
a warning that your image is larger than the printable area of the paper,
click Cancel, choose File > Print, and select the Scale To Fit Media box.
To make changes to your paper size and layout, click Print Settings, and
attempt to print the file again.
 Print dialog box
 In Mac OS, send
16-bit data to the printer to produce the highest possible quality in
subtle graduated tones, such as bright skies.
In Mac OS, send
16-bit data to the printer to produce the highest possible quality in
subtle graduated tones, such as bright skies.