Photographic Edges and Borders

![[ BLACK-BORDERED PRINT ]](images/borders/borders0.jpg)
Fashions come and go in photography. Silk-finish borderless color prints were the rage in the 1970s. And crinkle-edged black-and-white prints in the 1960s?
Another fashion that seems to run in cycles is black-bordered prints. Black borders were common from the 1800s through the 1930s, when most prints were made by contact instead of by enlarging. The clear film surrounding the image on the negative just naturally printed black, unless it was deliberately masked off by the printer. Margaret Bourke-White, who began her career in the 1920s and later became a famous photojournalist for Life magazine, reportedly insisted that all her negatives be "printed to black" -- that is, printed without cropping, with the surrounding clear film producing a natural black border. (Before publication, however, her pictures were often cropped by the editors.)
In the 1940s and 1950s, when enlarging became more common, photographers usually masked off their prints to make neat-looking white borders. Commercial photofinishers did the same. Then, from about the late 1960s to the early 1980s, black borders made something of a comeback, particularly on black-and-white fine-art prints. After a while, however, the pendulum swung back again the other way, and black borders were denounced as "arty" and "pretentious."
What's so great about black borders? They add depth to a print. A narrow jet-black border, surrounded by a larger white border, seems to make the image pop off the paper.
A black border also frames the image and defines its boundaries. If your picture contains large areas of light tones near a white border, sometimes you can't tell where the image stops and the border begins. I find this extremely annoying. Of course, this isn't a problem if the print is destined to be matted on a darker-colored mounting board. But how many people matt every print they make?
If you flip through almost any newspaper or magazine, you'll notice that many of the photographs (especially black-and-white photos) are surrounded by a fine black border, called a "rule" or a "hairline." Art directors and layout artists can't stand it when a photo with predominant light tones bleeds off into the white page.
![[ WHITE-BORDERED PRINT ]](images/borders/borders1.jpg)
This photograph of a very serious little girl waiting to march in a parade was printed from a 35mm negative without cropping. Although the white stripe on the pavement shows detail in the print, it still tends to bleed into the surrounding white border, which I find annoying.
Some people have been known to add the border after the print is made by actually drawing the lines with a black pen. But it takes a careful eye and hand to draw perfect lines around the edges of the image without smearing the ink or messing something up. A better way is to produce the border in the darkroom as part of the print-making process itself.
One approach is to cover the image on the easel with a sheet of cardboard, leaving a sliver of one edge slightly uncovered. Then you overexpose this edge with a small penlight, repeating the process for each side of the border. However, this method is difficult and not very reliable. Under the dim illumination of the safelight, it's almost impossible to make all four sides of the border equal in width, and the slightest light leak under the cardboard mask will ruin your image.
Instead, I recommend two alternative methods. One is to produce a "natural" black border, like those often seen in the days of contact prints; the other requires you to buy a special-effects easel or make a mask for your present easel.
I prefer natural black borders because they demand very little extra effort once you've modified your enlarger's negative carrier in the way I'm about to describe. They also help you become a better photographer by encouraging you to compose more carefully when you shoot your pictures in the first place.
Natural black borders happen automatically when you print the entire negative image without cropping, allowing the clear film around the image to print as well. The clear film prints as pure black, and all you have to do is adjust your easel to make the black border as wide or as narrow as you want. The black border will be surrounded by a larger white border where the blades of your easel mask off the edges of the print paper.
This method was used regularly by such photographers as Diane Arbus and Henri Cartier-Bresson, who composed meticulously in their viewfinders and rarely cropped their pictures. In addition to producing a natural black border, it also guarantees a higher-quality print, since you aren't wasting any negative area by enlarging the image more than necessary to fit the paper.
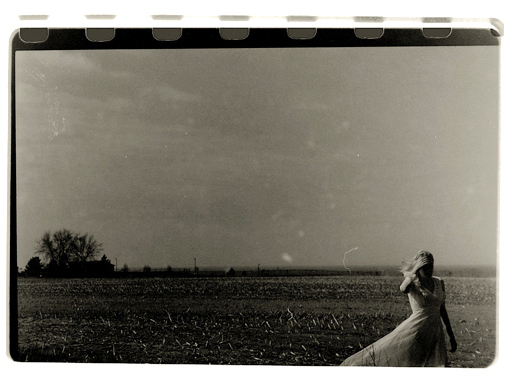
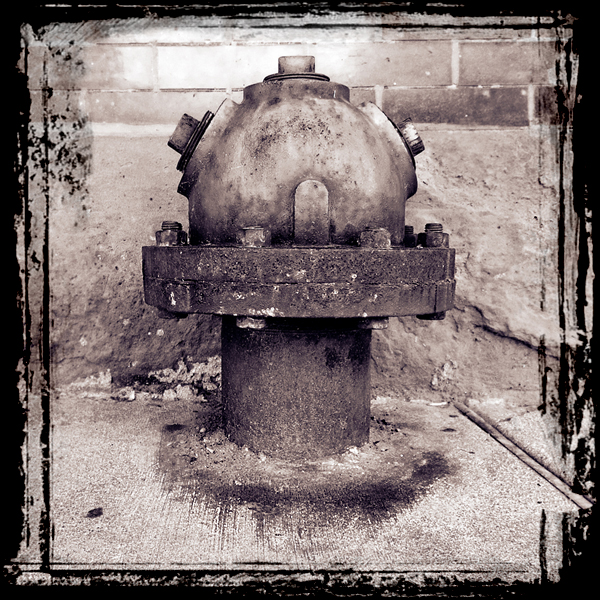
![[ NATURAL BLACK BORDER ]](images/borders/borders2.jpg)
Notice how this natural black border separates the image from the surrounding white border. The black border was masked with a four-bladed enlarging easel. I like this effect best.
Two objections are often raised to making black borders this way. First, not many of us are as skilled as Diane Arbus and Henri Cartier-Bresson, so our pictures may be significantly improved by cropping. Second, most negative sizes don't conform to the dimensions of standard print paper, resulting in uneven white borders when the image isn't cropped.
The first objection raises a good point. There's no doubt that cropping can often improve a photograph. In my opinion, however, many photographers crop on the easel far too routinely. The ability to second-guess their composition in the darkroom seems to encourage laziness when shooting. If you find yourself cropping almost every picture you enlarge, I think it's a clear indication that you need to revise the way you handle your camera. Either you aren't getting close enough to your subjects or you aren't paying enough attention to the viewfinder.
Also, I believe some types of photographs are actually harmed by overcropping. If you're taking a formal studio portrait, tight cropping is fine, because the subject usually expects it and you're essentially working in the mode of the traditional portrait painter. No one faults you for cropping out that unnoticed section of a light stand that intruded into the image. But if you specialize in street photography or informal portraiture -- sometimes known as "environmental portraits" -- tight cropping may detract from your goal by depriving your photograph of its context. (This would be an interesting subject for a future article.)
The second objection to natural black borders is the uneven white borders which result when negative sizes don't match the proportions of standard print papers. For example, the image area on a 35mm negative measures 24 by 36 millimeters, a 1 to 1.5 aspect ratio. But an 8x10 sheet of print paper has an aspect ratio of 1 to 1.25. No matter how you enlarge the image, it won't fit exactly on the paper. You either have to crop off part of the picture or leave a white border that's wider on the long sides than on the short sides.
That's why the medium-format 6x4.5 and 6x7-centimeter sizes are sometimes referred to as "ideal format" -- they enlarge more exactly to fit the standard paper sizes of 8x10 and 16x20. But even the 6x7 format doesn't fit too well on 11x14 paper, and of course the 6x6 square format doesn't match any size paper.
First, let's tackle the subject of making natural black borders by printing the entire negative area. To allow the clear film around the image to print, you'll probably have to modify your enlarger's negative carrier. You may be surprised to learn that most carriers don't let you print the entire image on the film. If you look closely, you'll notice that the opening in the carrier isn't quite large enough to reveal the whole image, much less any of the clear film around it.
There are exceptions. Some enlarger manufacturers sell carriers with oversized openings, such as 26x38mm for 35mm film. Some enlargers have adjustable carriers with movable blades, similar to four-bladed enlarging easels. However, most carriers will have to be modified.
It's a simple job, but it does require some care. Using a very small, fine-graded metal file, slowly begin filing away the opening in your negative carrier. Most carriers are made of soft metal such as aluminum, so it's not hard work. In fact, the main danger is filing away too much metal. Then your carrier won't hold the negative absolutely flat. This is particularly a hazard with rollfilm carriers, because unlike 35mm film, 120 rollfilm has no sprocket holes. On a 35mm carrier, you can enlarge the opening all the way out to the sprocket holes and still not worry about film flatness.
To keep from overdoing it, check your progress frequently by inserting a worthless negative into the carrier. Hold it up to the light and make sure you're enlarging the opening equally on all sides. An extra millimeter is all you need. (See the accompanying photo.) Don't worry if the edges of the opening are no longer exactly straight; you'll still be able to make a perfectly straight border by masking your print with the blades of your easel.
![[ MODIFIED NEGATIVE CARRIER ]](images/borders/borders3.jpg)
This closeup photo shows how the clear film surrounding an image is revealed when the negative carrier's opening is enlarged. The clear film will print as a natural black border. Actually, I filed away a little too much metal on this carrier; you don't have to leave quite so much clear film showing.
When the opening is large enough, touch up all the edges with an even finer-graded file or sandpaper to make sure there are no rough edges which could scratch a negative. Then wash the carrier thoroughly in water to remove all traces of loose metal filings. After it's dry, paint the exposed metal flat black to eliminate any chance of flare. I've modified three negative carriers in this manner for my Beseler 23C with no problems.
![[ MODIFIED NEGATIVE CARRIERS ]](images/borders/borders4.jpg)
Here are two examples of negative carriers modified for printing natural black borders. The openings were enlarged with a metal file, then painted flat black to eliminate flare.
When you center a negative in your modified carrier, enough clear film will show through to print anything from a thick black border to a very sharp hairline rule, depending on how you adjust the blades of your easel. The accompanying photos demonstrate some of the variations you can achieve. For maximum flexibility, four-bladed enlarging easels work best.
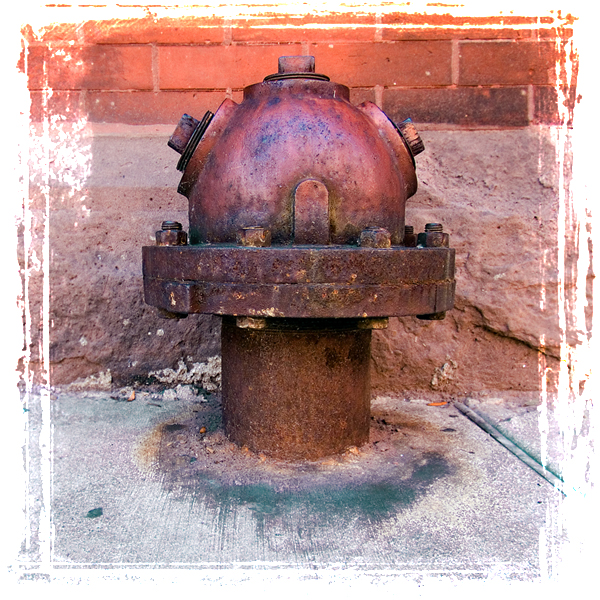
![[ RAW BLACK BORDER ]](images/borders/borders5.jpg)
If you don't mask off the clear film around the image with the blades of your enlarging easel, you'll get a raw black border that (with a 35mm negative) extends all the way out to the sprocket holes. Some people like this effect. I think it distracts the viewer's eyes from the image, but it's useful as a special effect.
As a bonus, you'll also get more image area when printing photographs taken with extreme wide-angle lenses. Due to the way these lenses project light through the camera's film gate, the on-film images are a teeny bit wider than those made with longer lenses. Without a modified negative carrier, that extra bit of width is wasted. In fact, the on-film image made by my 21mm lens is nearly one millimeter wider than the image made by a standard lens on the same camera. In effect, a modified negative carrier turns a 21mm lens into the equivalent of a 20mm lens.
If you must crop your picture, or if you prefer prints with even white borders all around, you won't be able to make a natural black border. However, you can still make black borders by turning to another method: using a special-effects easel or a mask with your present easel.
Special-effects easels are available from several manufacturers. Mine is made by Saunders and is called the Special Border Salon Easel. It's a nonadjustable easel available in 8x10 and 11x14 sizes and, like other easels of its type, allows you to create a variety of border effects. You can make an ordinary print with a plain white border, a similar print with a completely black border, a white-bordered print with a hairline black border, a black-bordered print with a hairline white border, and several kinds of prints with patterned borders of your own design. If you're not careful, you might get carried away with these easels and spend more time making borders than making pictures!
To make a white-bordered print with a hairline black border (which is actually a little thick to be considered a true hairline), the Saunders easel comes with a clever mask that automatically yields perfectly straight, even borders on all sides. The black plastic mask is designed to barely fit inside the fixed frame of the easel. After your basic print exposure, you place the mask directly on the paper, effectively shielding it from further exposure. By shoving the mask toward one corner, the opposite two sides of the image are left slightly uncovered. You then expose the print to white light from the enlarger after removing the negative from the carrier.
Following this exposure, you shove the mask toward the opposite corner of the image and expose again. As a result, all four edges of the picture have now been exposed to bare light from the enlarger. All you have to do next is remove the paper from the easel and develop normally.
This technique is almost foolproof and always results in perfect black borders. However, my easel sometimes leaks a bit of light around the edges, so I cover the edges with folded paper. (If the easel were redesigned with a slight lip, this wouldn't happen.) Also, I dislike removing the negative from my enlarger to make the border exposures, because I have to realign and dust the negative before making another print of the same image. Therefore, I usually expose the borders not with the enlarger, but by firing a small electronic flash at the ceiling of my darkroom. (Don't forget to close your eyes first!) A weak penlight also does the job. Either way is much faster than using the enlarger, and the mask covers the paper so well that there's no risk of spoiling the picture.
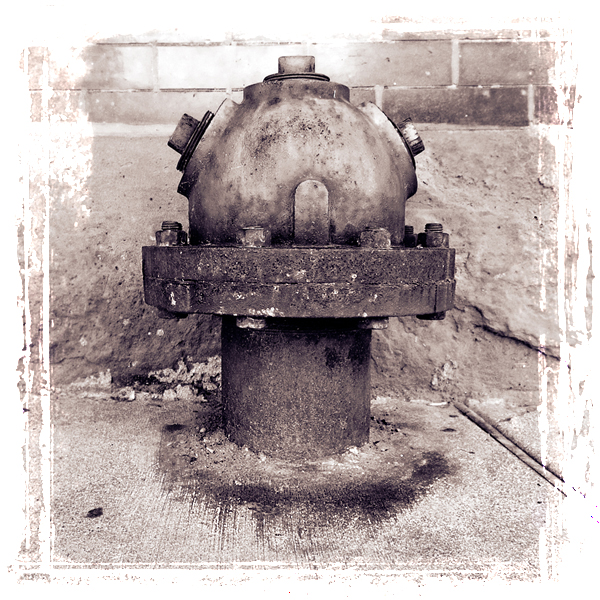
![[ FLASHED BLACK BORDER ]](images/borders/borders6.jpg)
An 8x10 Saunders Special Border Salon Easel was used to make this narrow black border. It results in a perfectly even, one-inch white border on all sides, unlike a 35mm negative printed without cropping. However, this is a case in which I think cropping does not improve the composition. Although attention is focused on the main subject, I'd rather see the faces of the girls in the background. You may disagree!
If you don't need all of the more exotic capabilities of a special-effects easel, you can try fashioning a similar mask for an adjustable easel just to make black-bordered prints. But it's not as easy as it sounds. The mask must be absolutely flat and opaque, and the edges must be trimmed very true. Then you'll have to adjust the blades of your easel so the mask barely fits inside and leaves an exposed border of the exact width you desire. If you're handy, give it a try; it's certainly less expensive than buying special-effects easels for all the different sizes you need.