Basic Sharpening in
Photoshop
There
are several ways to sharpen in Photoshop, the most useful of which is usually
the Unsharp Mask filter (Filters, Sharpen, Unsharp Mask.)
The
unsharp mask tool has three parameters, Amount, Radius and Threshold. The
threshold setting is used to set where in the image the sharpening will occur.
At zero the whole image will be sharpened. Otherwise the value sets a minimum
level between adjacent pixels; if the difference in values is less than this,
sharpening will not occur. For most purposes a value 0-10 is used, but higher
values will help to avoid the creation or emphasis of unevenness in smooth areas
of tone.
Radius
is used to set the amount and extent of the sharpening. We can set decimal
fractions values, such as 0.3, in this box, although when sharpening an image
for print output, rather larger values will be needed. Overlarge values will
give visible halo effects around edges. A small degree of halo formation is
essential to get the sharpest possible effects in print (either from inkjet
printers or from repro) but should be avoided if possible for work on screen.
The
Amount setting largely seems to act as a multiplier for the radius. If you are
using the Unsharp Mask filter for 'creative sharpening' it will most normally be
in the range 60-150%, but when applying 'output sharpening' for print you may
need rather higher values.
Some
people prefer to use unsharp masking not on the RGB image, but to convert this
to a LAB image and sharpen only the lightness channel. The image is then
converted back to RGB. This can avoid the problem of colour artifacts which are
sometimes generated when sharpening.
Even
with careful tweaking of the Threshold value, unsharp masking tends to increase
noise in areas of relatively smooth tone. Generally you want to sharpen the
edges while leaving these areas unchanged. This can be achieved by selecting the
edge areas with a suitable selection mask before applying the unsharp mask
filter.
1.
Duplicate the image,
using 'Image', 'Duplicate', accepting the default file name.
2.
Change the duplicate
to Gray Scale, using Image, Mode, Grayscale
3.
If the image is 16
bit, change to 8 bit, using Image, Mode, 8 bit
4.
Find the edges using
Filter, Stylize, Find Edges.
5.
Open the levels
dialogue (Ctrl+L) and shift the white-point marker at the right under the
histogram to the left until only edges are shown. You can also move the black
point marker to the right to make the black edges more definite. The OK to apply
6.
Use Filter, Blur,
Gaussian Blur, adjusting the radius to keep the edges clearly visible but with
soft edges - typically around 2 pixels, OK to apply.
7.
Invert the image
using Ctrl + I
8.
Open the Levels
dialogue (Ctrl+L) and again shift the white point marker to get clear whites, OK
9.
Return to the
original image, and 'Select, Load Selection' accepting the default name as a new
selection.
10.
Press Ctlr+H to hide
the 'marching ants' and then use Filters, Sharpen, Unsharp Mask. For 'Creative
Masking' choose relatively small values of radius, perhaps around 0.5-2 pixels,
keep the threshold at zero and adjust the amount to get sharpness without
significant halos. For Output sharpening for printers, try values of 1.5-4
pixels for the radius, viewing the image at 25% and making the effect slightly
too noticeable on screen. OK to apply.
It
would be better practice to carry out the sharpening on a layer, but this would
double the final file size.
Unsharp Mask Filter
About the Photoshop sharpening
filters
Use the Unsharp Mask (USM) filter to
sharpen your images. The controls provided by this filter make it the best
choice for sharpening. Although Photoshop also has the Sharpen, Sharpen Edges,
and Sharpen More filter options, these filters are automatic and do not provide
controls and options. You might use these filters for producing creative effects
in your image.
Photoshop lets you sharpen your
entire image or sharpen part of your image by using a selection or mask. Since
the Unsharp Mask filter can only be applied to one layer at a time, you might
need to merge layers or flatten your file to sharpen all image layers in a
multilayered file.
Note: The name, Unsharp Mask, makes
the filter seem like an unintuitive choice for sharpening an image. The term
comes from a darkroom technique used in traditional film-based photography. The
effect of a sharpened edge can be produced by sandwiching a photographic
negative and a slightly blurred and underexposed copy negative in the enlarger.
Then the photographic paper is exposed through the sandwiched negatives.
Using the Unsharp Mask filter
The Unsharp Mask does not detect
edges in an image. Instead, it locates pixels that differ in value from
surrounding pixels by the threshold you specify and increases the pixels'
contrast by the amount you specify. So, for neighboring pixels specified by the
threshold, the lighter pixels get even lighter and the darker pixels get even
darker based on the specified amount.
In addition, you specify the radius
of the region to which each pixel is compared. The greater the radius, the
larger the edge effects.

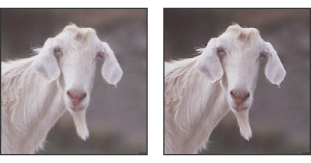
Original
image and Unsharp Mask applied
The degree of sharpening applied to
an image is often a matter of personal choice. However, over-sharpening an image
produces an unattractive halo effect around the edges.

Over-sharpening
an image produces a halo effect around the edges.
The effects of the Unsharp Mask
filter are more pronounced on-screen than in high-resolution output. If your
final destination is print, experiment to determine what settings work best for
your image.
To
use Unsharp Mask to sharpen an image:
![]() Click
the image in the preview window and hold down the mouse to see how the image
looks without the sharpening. Drag in the preview window to see different parts
of the image, and click + or - to zoom in or out.
Click
the image in the preview window and hold down the mouse to see how the image
looks without the sharpening. Drag in the preview window to see different parts
of the image, and click + or - to zoom in or out.
Although there is a preview window
in the Unsharp Mask dialog box, it's best to move the dialog box so you can
preview the effects of the filter in the document window.
Adjusting the Radius value depends
on the subject matter of the image, the size that the image will be reproduced
at, and output method. For high-resolution images, a Radius between 1 and 2 is
usually recommended. A lower value sharpens only the edge pixels, whereas a
higher value sharpens a wider band of pixels. This effect is much less
noticeable in print than on-screen, because a 2-pixel radius represents a
smaller area in a high-resolution printed image.
![]() If
applying Unsharp Mask makes already bright colors appear overly saturated,
convert the image to Lab mode and apply the filter to the Lightness channel
only. This sharpens the image without affecting the color components.
If
applying Unsharp Mask makes already bright colors appear overly saturated,
convert the image to Lab mode and apply the filter to the Lightness channel
only. This sharpens the image without affecting the color components.
Selective sharpening
You can sharpen part of your image
instead of the entire image by using a mask or a selection. This is useful when
you want to prevent certain parts of your image from being sharpened. For
example, you can use an edge mask with the Unsharp Mask filter on a portrait to
keep the facial skin soft looking but sharpen features like the eyes, mouth,
nose, and outline of the head.

Using an
edge mask to apply the Unsharp Mask only to specific features in a portrait
To
sharpen a selection:
The image area within the selection
will be sharpened, leaving the rest of the image untouched.
To
selectively sharpen an image using an edge mask:
There are many ways to create an
edge mask. Experiment with the following method:

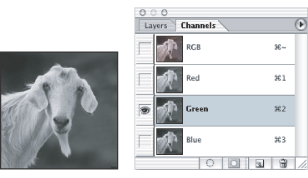
Showing a channel with the greatest
contrast

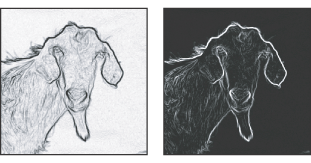
Find Edges filter applied and image
inverted

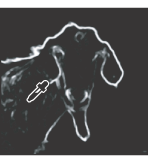
Set the black point high in Levels
to eliminate random pixels in the edge mask
Note: You can create an action to
conveniently apply all the steps in the procedure.
Sharpen a photo
![]() How
To Tip:
How
To Tip:
Sharpen a photo using the Unsharp
Mask filter.
![]() If
you want to sharpen only a specific element or area in the image, create a
selection marquee around the area you want to sharpen using the selection tools.
The selection marquee limits the changes to that area. To soften the edge of the
selection so the changes blend in more naturally with the unselected areas, use
the Feather command (Select > Feather).
If
you want to sharpen only a specific element or area in the image, create a
selection marquee around the area you want to sharpen using the selection tools.
The selection marquee limits the changes to that area. To soften the edge of the
selection so the changes blend in more naturally with the unselected areas, use
the Feather command (Select > Feather).
![]() You
can let Photoshop sharpen the image for you using the three other Sharpen
filters. Choose Filter > Sharpen, and then choose one of these filters from
the submenu: Sharpen, Sharpen Edges, or Sharpen More.
You
can let Photoshop sharpen the image for you using the three other Sharpen
filters. Choose Filter > Sharpen, and then choose one of these filters from
the submenu: Sharpen, Sharpen Edges, or Sharpen More.